Why is the Night Sky a Source of Wonder for Beginners in Astrophotography?
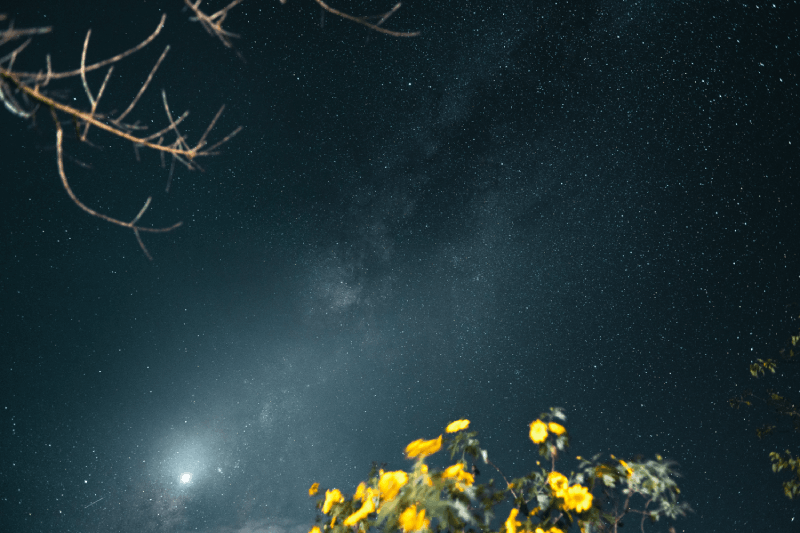
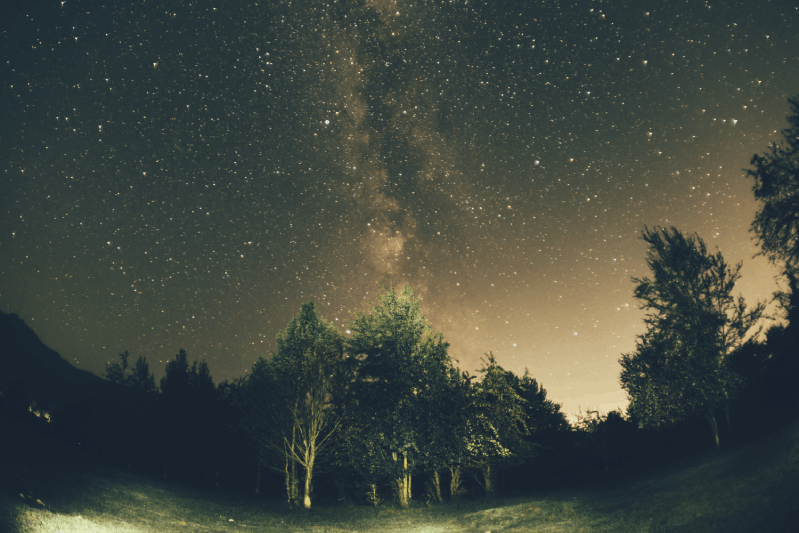
The night sky has always been a source of curiosity and admiration throughout human history. When you are away from city lights, witnessing the existence of thousands of stars, nebulae, and galactic dust clouds that cannot be seen with the naked eye offers a spiritual experience that reminds one of their place in the universe. In terms of photography, this situation is the art of making the unseen visible. Thanks to long exposure techniques, our sensor collects light photons that the human eye cannot perceive, presenting us with the magnificent details and color palette of the Milky Way. This process is not just a technical shot; it is also a deep connection established with nature and the cosmos. Each frame tells a unique story, reflecting the frozen time and the infinity of the universe.
What Type of Camera Body Should be Preferred for Star Long Exposure?
In star photography, the choice of camera body is the most critical factor affecting the image quality and low light performance. An ideal body should have a full-frame sensor that produces minimal noise even at high ISO values. Full-frame sensors collect more light due to their larger surface area, which is vital for night shots. Additionally, having a wide dynamic range in the camera helps preserve details between the brightest stars in the sky and the darkest areas. Nowadays, mirrorless systems have started to surpass DSLR systems due to their lightweight and features that facilitate night focusing through digital viewfinders. If your budget is limited, crop sensors (APS-C) can also be used, but in this case, you will need to opt for wider apertures in lens selection.
What is the Role of Wide Aperture Lenses in Night Photography?
In astrophotography, wide aperture lenses are essential for capturing the vastness of the night sky and combining foreground elements in the same frame. Typically, focal lengths between 14mm and 24mm are preferred. This wide aperture allows you to fit a large portion of the Milky Way into the frame and provides longer exposure times within the "500 Rule" framework, preventing stars from becoming trails. A wide aperture lens offers a perspective that gives the viewer a sense of being inside the scene. Especially lenses with f/2.8 or wider (like f/1.8, f/1.4) maximize the amount of light entering the sensor, eliminating the need to raise the ISO too high. This results in cleaner, sharper, and less noisy photographs.
How Does Aperture Affect the Sharpness and Light of Stars?
The aperture is like the pupil of a lens and should be kept as wide as possible in night photography. Values of f/2.8 or lower ensure that the weak light from the sky reaches the sensor as quickly as possible. However, opening the aperture all the way can lead to optical defects such as "vignetting" or "chromatic aberration" (where stars appear to have a halo effect at the edges). Therefore, using a quality lens or stopping down the aperture by half a stop can sometimes help achieve sharper stars. Since stars are points of light in infinity, the amount of light provided by the aperture directly determines their brightness. If your aperture is not wide enough, you will have to excessively increase the ISO to make the stars visible, which creates unwanted noise in the photograph.
How to Balance Noise and Light Sensitivity When Setting ISO Value?
ISO expresses the sensitivity of the digital sensor to light and is generally kept between 1600 and 6400 in night photography. However, using high ISO brings along the issue of "digital noise". To establish this balance, you need to know your camera's "ISO Invariance" feature. Some modern cameras yield cleaner results when shooting at low ISO and later brightening through software, while others perform better at high ISO. As a general rule, after setting the aperture to the widest value and adjusting the exposure time to the maximum point where stars will not trail, you should increase the ISO value by checking the histogram. It is important that the histogram does not peak on the left, meaning that details in the shadows are not completely lost. Using "stacking" techniques after shooting can make high ISO usage safer.
What is the "500 Rule" and How Does it Prevent Stars from Becoming Trails?
Since the Earth rotates on its axis, the stars in the sky are actually in constant motion. When a very long exposure is made, this motion causes the stars to appear as short trails instead of points in the photograph. The "500 Rule" is a simple formula that helps you calculate the maximum exposure time in seconds required to keep the stars as points. The formula is: 500 / Focal Length (Full Frame equivalent). For example, if you are using a 20mm lens, you can expose for 25 seconds without the stars trailing (500 / 20 = 25 seconds). If you are using a crop sensor, you should first multiply the focal length by the crop factor (1.5x or 1.6x) and then divide 500 by that number. In today's high-resolution sensors, sometimes using the "400 rule" or the more precise "NPF rule" can yield sharper results.
Why is Wind Resistance and Material Quality Important in Tripod Selection?
In night photography, even the slightest vibration can completely ruin a long exposure lasting several seconds. Therefore, using a heavy and stable tripod that will not shake even in windy conditions is vital. Carbon fiber tripods stand out for their lightweight and vibration-dampening capabilities, while aluminum tripods offer a more affordable and sturdy option. The head of your tripod (usually a ball head) should be able to comfortably support the weight of the camera and securely lock in every position. When shooting on a windy night, you can increase stability by hanging your bag from the hook on the center column of the tripod to lower the center of gravity. Remember, a camera and lens system worth thousands of lira will only produce a blurry image if it shakes on a low-quality tripod.
How to Read Light Pollution Maps and Bortle Scale?
Your biggest enemy for successful star photography is city lights. The "Bortle Scale" is used to measure the darkness level of the sky. This scale ranges from 1 (completely dark, untouched nature) to 9 (city center, almost no stars visible). Ideal for astrophotography are areas at Bortle levels 1, 2, or 3. Websites and applications like "Light Pollution Map" show the light pollution in your area on colored maps. While blue and gray areas represent the darkest places on the map, you should avoid red and white areas. Reviewing these maps before heading out ensures that you find a sky clear enough to see the Milky Way with the naked eye and prevents your efforts from going to waste.
What is the Effect of Moon Phases on Star Photography?
Many new photographers think that the sky will be very bright during a full moon and that they will take better photos, but the reality is quite the opposite. The moon is the strongest natural light source in the sky and during the full moon phase, it completely overshadows the light of the Milky Way and faint stars. The best star photographs are taken during the "New Moon" phase when the moon is not in the sky or when the moon sets before or rises after the shooting time. However, the moon should not be completely disregarded; sometimes a crescent moon with a 10-20% illumination can add natural depth to the photo by softly illuminating the foreground. Keeping track of the sky calendar and knowing the moon phases in advance is crucial for planning your shoot.
Why is Shooting in RAW Format Essential in Night Photography?
JPEG format is a format in which the camera processes and compresses the image, and during this process, a lot of data, especially in dark areas, is lost. Night photographs are inherently very dark, so you need RAW format to open shadows, adjust white balance, and eliminate noise during the editing phase (post-processing). RAW files store the raw data captured by the sensor and allow you to intervene in exposure by up to 2-3 stops. Being able to adjust the white balance after shooting without color distortion is critical for capturing the natural blue-purple tones of the sky. If you shoot in JPEG, you will create banding in the color transitions in the sky, and the photograph will be far from looking professional.
How to Use Live View to Set Focus to Infinity?
In the dark, the automatic focus (Auto Focus) system does not work. Therefore, you need to switch your lens to manual focus (MF) mode and manually focus on the stars. The most effective method is to activate the "Live View" mode on the LCD screen at the back of your camera. You should direct the image on the screen to the brightest star and digitally zoom in to the maximum level (10x or more). Then, by slowly turning the focus ring of the lens, you should find the moment when that star becomes the smallest and sharpest point on the screen. If the star is getting bigger, you are losing focus. After focusing, securing the focus ring with a piece of tape to avoid accidentally touching it ensures that your focus remains intact throughout the night.
What Techniques Prevent Camera Shake During Long Exposure?
When you press the shutter button with your finger, even a tiny shake occurs, and this shake can ruin the sharpness at the beginning of a 20-30 second exposure. To prevent this, using a remote control (shutter release cable) or a wireless trigger is the most professional solution. If you do not have this equipment, you can use your camera's built-in "2-second or 10-second timer" mode. This way, after you press the button, the camera shake stops, and the exposure starts then. Additionally, for DSLR users, activating the "Mirror Lock-up" feature eliminates the mechanical shake caused by the mirror flipping up. In mirrorless cameras, using the "Electronic Front Curtain Shutter" allows you to achieve a completely shake-free shot.
How Does Foreground Lighting Add Depth to the Photograph?
Simply capturing the night sky can sometimes create a two-dimensional and incomplete feeling. To add a story and depth to your photograph, you should use an interesting element in the foreground (like an old tree, an abandoned cabin, or interesting rock formations). However, when you expose for the sky, the foreground usually comes out completely black. With the "Light Painting" technique, you can illuminate the foreground for a few seconds during the exposure with a very low-powered flashlight. The key word here is "less is more". Using too much light can create an artificial image. Alternatively, you can shoot the foreground during the blue hour (just after sunset) and then shoot the sky at the same spot at night, combining these two frames in Photoshop. This method allows you to achieve the highest detail in the foreground and the least noise.
What Measures Should Be Taken Against Dew Formation and Lens Fogging?
On humid nights, dew formation on the front glass of the lens due to the cooling of the air is a common problem. This situation leads to the photographs becoming increasingly blurry and eventually being covered by a completely white veil. Professional astrophotographers use "USB dew heaters" that wrap around the lens and operate with a power bank. These heaters keep the lens a few degrees above the ambient temperature, preventing moisture from forming. If you do not have a heater, you can create a similar effect by wrapping chemical hand warmers around the lens and securing them with rubber bands. Additionally, waiting for a while to acclimatize the camera to the outside temperature before starting the shoot helps prevent sudden fogging.
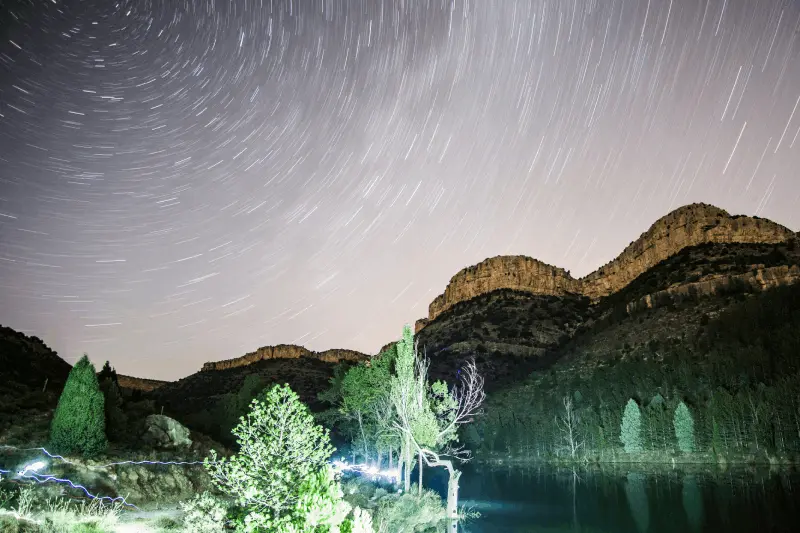
How Many Frames Should Be Taken for Star Trail Photographs?
Star trail photographs are impressive works that visualize the rotation of the Earth. These types of photographs can be taken in two ways: a single very long exposure (30-60 minutes) or many short exposures (hundreds of 30-second frames). Nowadays, the second method is more common to prevent sensor heating and reduce noise. It is generally recommended to take between 100 and 300 consecutive frames. These frames are then combined using free software like "StarStax" or through the "Lighten" blending mode in Photoshop. The longer the total exposure time (at least 1 hour is recommended), the longer and more magnificent the circular paths that the stars trace in the sky will appear. If you center on the North Star (Polaris), you will achieve a complete circular motion.
How is Noise Reduction Achieved with Stacking Method?
Image stacking is the process of mathematically eliminating random noise caused by high ISO usage. In this technique, 10-20 photographs are taken in succession in the same frame. Software like "Sequator" (Windows) or "Starry Landscape Stacker" (Mac) overlays these photographs on top of each other. The software detects the randomly varying noisy pixels in each frame and aligns them to create a clean image; however, it keeps the stationary stars sharp. With this method, you can achieve clean, detailed, and noise-free night sky photographs as if they were taken at ISO 100. This technique is a standard for those who want to bring out the details of the sky (like the dust clouds of the Milky Way).
How Do Astro Tracking Devices Improve Photo Quality?
A "Star Tracker" is a motorized device that rotates your camera in the opposite direction of the Earth's rotation speed. With this device, you can make very long exposures of 2, 3, or even 5 minutes without being bound by the 500 Rule. When using a tracking device, the stars remain as points while the sensor collects much more light and color information. As a result, colorful nebulas, hydrogen clouds, and star clusters within the Milky Way appear with incredible clarity. However, since the tracking device follows the sky, the foreground on the ground will become blurry. Therefore, photographers using tracking devices take separate shots of the sky and foreground by blocking the tracking device and then combine these two images digitally.
What is the Best Season to Capture the Milky Way Galaxy?
The "Galactic Center", which is the brightest and most visual part of the Milky Way, is not always visible in the northern hemisphere. The Milky Way season generally starts in March and continues until October. In March and April, the Milky Way rises in the morning, while in the summer months (June-August), it is elevated in the sky throughout the night. In winter months, the Galactic Center is very close to the Sun, making it invisible in the night sky; during this period, the fainter outer arms can be seen. Using mobile applications like "PhotoPills" or "Stellarium" to see the position, angle, and rising times of the Milky Way in advance is essential to be in the right place at the right time.
What Are the Ways to Extend Battery Life in Cold Weather?
Lithium-ion batteries discharge much faster in cold weather conditions due to slowed chemical reactions. Battery management is critical since night shoots often last for hours. Before heading out, make sure all your batteries are fully charged and carry spare batteries in your inner pockets to keep them warm. Reducing the brightness of the camera's LCD screen to the lowest level or turning it off completely saves energy during the shoot. If your camera supports it, using a dummy battery or a power bank that provides continuous power via USB allows for uninterrupted shooting throughout the night. Additionally, instead of immediately bringing the camera and batteries into a warm environment after the shoot, it is advisable to gradually warm them up to prevent moisture formation.
How Does White Balance Adjustment Change the Color of the Night Sky?
Automatic White Balance (AWB) often fails in night photography and can render the sky in overly orange or unbalanced colors. To capture the natural night blue of the sky, manually setting the white balance between 3200K and 4200K (Kelvin) is a good starting point. Lower Kelvin values (blue tones) help neutralize the yellowish haze created by light pollution. However, if you are shooting in RAW format, the white balance is actually a "non-destructive" setting; meaning you can change the color as you wish on the computer without any data loss after shooting. Still, seeing a color close to reality on the LCD screen at the moment of shooting helps you better evaluate the composition and lighting.
What Are the Advantages of Using an Intervalometer?
An intervalometer is an external remote that instructs the camera to take photographs at specific intervals. It is indispensable, especially for star trail shots or accelerated video (time-lapse) projects. With this device, you can set how many photographs will be taken, how long each photograph will last, and the waiting time in between (usually 1-2 seconds). While you sip your hot tea in your car or sleep, the intervalometer does the work for you at the camera. Some modern cameras have this feature built-in; however, using an external device reduces the risk of creating shake while navigating the camera's menus and offers more complex programming options.
What Atmospheric Conditions Deteriorate the Sharpness of the Sky?
Finding a cloudless sky is not enough; "atmospheric seeing" and "transparency" are also very important. High-speed winds or temperature differences in the atmosphere cause stars to twinkle (scintillation), which leads to less sharp photographs. Additionally, humidity, dust, or smoke in the air can reduce the transparency of the sky, causing stars to appear faint. Astro-meteorology sites (like Meteoblue) predict "Seeing" values, telling you how stable the sky will be. The sharpest photographs are usually taken on nights after rain when all the dust in the air has been cleared and the atmosphere is calm. Climbing to higher altitudes also improves image quality due to thinner and cleaner atmosphere.
What Settings Should Be Used in Adobe Lightroom to Enhance Stars?
During the editing phase, Lightroom is the best friend of astrophotographers. To enhance the stars, the "Clarity" and "Dehaze" sliders should be carefully increased. "Dehaze" cleans up slight haze and light pollution in the sky, increasing contrast. However, excessive use of these sliders can create artificial-looking dark spots in the photograph. To enhance the dust clouds of the Milky Way, increasing the "Whites" value and decreasing the "Blacks" value brings the dynamic range to life. Using "Vibrance" instead of "Saturation" for color enhancement provides more natural transitions. Additionally, applying a slight "S" curve on the "Tone Curve" will give the photograph that professional depth and contrast.
How to Separate the Sky and Ground Using Masking Techniques?
Generally, the adjustments needed for the sky and foreground are completely different. While contrast and sharpness are desired in the sky, the priority in the foreground is to open shadows and eliminate noise. The "AI Masking" features in modern software allow you to select the sky with a single click. While the sky is selected, you can only intervene with the stars, then invert the mask to adjust only the trees or rocks in the foreground. This way, you can illuminate the sky while preventing the foreground from blowing out or vice versa. The "Graduated Filter" applied to the sky is a very effective tool for reducing light pollution on the horizon and making the upper parts darker and more dramatic.
What Should Be the Overlap Ratio When Taking Panoramic Star Photographs?
Sometimes even the widest lens cannot fit the vast arc of the Milky Way into a single frame. In this case, panoramic shooting is necessary. The camera should be positioned vertically, and a series of photographs should be taken from left to right. For successful stitching, each frame should overlap with the previous one by at least 30% to 50%. This overlap ensures that the software recognizes the stars in the photographs as common points and stitches them together accurately. In panoramic shots, it is essential to use "Manual Mode" to keep the exposure values and white balance the same in each frame. Panoramic photographs are an ideal method for those who want to make massive prints since they offer much higher resolution than normal frames.
What is the Effect of Fisheye Lenses on Composition?
Fisheye lenses can capture almost the entire sky in a single frame with a 180-degree field of view. These lenses create very characteristic and artistic distortions due to their bending of the horizon line. If you place the horizon line perfectly, it looks flat, but if you tilt it up or down, the world appears as if it is a sphere. These lenses, which fully encompass the Milky Way arc, are especially great for showcasing the sky in tight spaces (like inside a cave or a forest clearing). However, due to extreme distortion at the edges, great care must be taken with composition rules. To avoid excessive distortion of objects, keeping the main point of interest close to the center usually yields more aesthetic results.
How to Understand Proper Exposure in Night Photographs through Histogram Reading?
In pitch darkness, it is impossible to determine whether your exposure is correct by looking at the camera's LCD screen; because in the dark, the screen always appears very bright and can mislead you. Your only real guide is the "Histogram" graph. In a healthy night photograph, the histogram's bulk should be concentrated on the left side (shadows) but should not touch the left wall (clipping). If the graph peaks on the left, it means you have lost all details in the dark areas, and you cannot recover them through editing. The ideal histogram is a graph that starts slightly to the left of the "peak" shape and gradually fades to the right. If the stars are peaking too brightly and touching the right wall, you will lose the color of the stars and only get white dots; therefore, you need to reduce the exposure slightly.
Why Are Dark Frames Taken and What Do They Do?
Dark frames are used to eliminate "hot pixels" produced by the heated sensor during long exposures and to reduce sensor noise. After finishing your shoot, you should cover the lens and take a few blank frames with the same settings (same seconds, same ISO, same temperature) you used earlier. These frames will only contain the noise and faulty pixels generated by the sensor. Later, stacking software mathematically subtracts these "dark frames" from your original photograph. The result is a much cleaner photograph free from sensor errors. In modern cameras, the "Long Exposure Noise Reduction" feature does this automatically, but since this process doubles the exposure time (30 seconds of shooting + 30 seconds of processing), professionals often prefer to shoot manually.
How to Plan for Safety and Logistics in Night Photography?
Being alone in nature at night carries certain risks. Before heading out to shoot, always inform someone about where you are going and when you will return. Always carry spare batteries, a headlamp (red light ones do not disturb night vision), warm clothing, and a basic first aid kit. Scouting the area where you will shoot during the day helps you know where the cliffs or marshy areas are in the dark. Take precautions against wild animal risks like bears or wild boars (in some areas, bear spray may be necessary). If you are going to areas where the phone does not work, downloading offline maps or carrying a GPS device can be lifesaving.
What Are the Dangers of Sensor Heating During Long Exposures?
Digital sensors heat up when they are active for long periods and continuously process data. This heat causes a distortion known as "thermal noise", which usually appears as purple or reddish spots in the photograph. Especially during hot summer nights, consecutive 30-second exposures can severely strain the sensor. To minimize this, allowing the camera to rest for a few seconds between each exposure or taking short breaks to cool the sensor in very hot weather is beneficial. Mirrorless cameras are more prone to rapid heating than DSLRs since their sensors are continuously exposed. Professional astro cameras have active cooling (fan or peltier) systems to solve this issue, but for standard consumer cameras, user patience and smart shooting intervals are the best solutions.
How to Expose Deep Space Objects with Telephoto Lenses?
Astrophotography is not just about wide angles; you can capture galaxies, nebulae, and the Moon in much more detail with telephoto lenses like 70-200mm or 400mm. However, as the focal length increases, the allowed exposure time according to the 500 Rule becomes very short (for example, only 2.5 seconds for 200mm). Collecting enough light in such a short time is very challenging, so using an "Astro Tracking Device" is almost essential for deep space photography. With a tracking device, targets like the Andromeda Galaxy or Orion Nebula can present immense details as if you were looking through a telescope. In these types of shots, the "stacking" technique elevates the quality by combining hundreds of frames.
How to Apply Composition Rules in Star Long Exposure?
A beautiful sky alone is not enough; a supporting composition elevates the photograph to the level of "art". According to the "Rule of Thirds", placing the Milky Way or the main point of interest at the intersection points of the thirds in the frame makes it more comfortable for the eye. Using "leading lines" to guide the viewer's eye from the foreground to the sky (like a road, river, or rock formation) enhances the sense of depth. Additionally, it is important to establish a balance between the silhouette of the foreground object and the bright stars in the sky. Using "negative space", meaning allowing the voids in the sky to occupy a large part of the frame, is a powerful narrative tool that emphasizes the vastness of the universe and the feeling of solitude.
What Should Be Considered When Photographing Meteor Showers?
Meteor showers like Perseids or Geminids offer light phenomena in the sky several times a year. Capturing meteors is largely a matter of luck, but to increase this luck, you should set your camera to continuous shooting mode with an intervalometer. Knowing the focal point (radiant) where meteors will appear in the sky and directing the camera towards that direction is important. Since meteors move very quickly, you should use high ISO and wide aperture to freeze them. What distinguishes meteor trails from regular star long exposures is that the beginnings and ends of meteors taper off and sometimes emit different colors (green, orange). Even capturing a big meteor in just a few of the thousands of frames taken until dawn will make all your fatigue worthwhile.
Why Should the Viewfinder Be Covered to Prevent Light Leaks?
There is a hidden danger for DSLR camera users: light leaking from the viewfinder. During long exposures, any light source behind the camera (your headlamp or another photographer's light) can leak into the viewfinder and fall onto the sensor, creating strange purple or white spots in the photograph. To prevent this, you should cover the viewfinder with a small cap (usually found on the camera's strap) or a piece of black tape before starting the exposure. In mirrorless cameras, since the viewfinder is digital and the light does not go directly to the sensor, this is not an issue. However, in any case, being careful about leaks from places like the distance indicator window on the side of the lens is a professional approach.
How Much Do Digital Noise Reduction Software Improve Results?
AI-powered software like "Topaz DeNoise AI" or "DXO PureRAW" has revolutionized the cleaning of noise in night photographs. These programs have the ability to clean the noisy structure while preserving details. However, one should not rely entirely on these tools and compromise on shooting quality. The software cannot create details that do not exist; it can only clean what is already there. The best results come from shooting the cleanest frame in the field (with low ISO or stacking) and then using these programs as a final touch. Excessive use can make the photograph look "plastic" and erase the stars, so it is more logical to apply noise reduction only to the empty areas of the sky using "masking".
How to Fix Color Shifts During Photo Editing?
Especially in wide aperture and very bright lenses, purple or green halos (Chromatic Aberration) can form around bright stars. This situation diminishes the sharpness and professionalism of the photograph. Checking the "Remove Chromatic Aberration" box in the "Lens Corrections" tab within Lightroom or Camera RAW often solves the problem. If it still persists, you can make a specific intervention to that color using the "Defringe" slider. Preserving the natural colors of the stars (blue, white, orange) starts with cleaning up false color shifts. A clean color palette prevents the viewer's attention from being distracted and enhances the photograph's authenticity.
Why is it Important to Maintain Motivation and Patience in Night Photography?
Astrophotography is 90% preparation and waiting, and 10% pressing the shutter. Long journeys, freezing cold, sudden clouds, or dead batteries can lead to disappointment. However, when you capture that perfect frame and see the Milky Way in all its glory on your camera's screen, all the difficulties are forgotten. Patience is the cornerstone of this hobby. Sometimes you may need to go to the same spot five times for a single photograph. Learning to enjoy those quiet hours spent alone with nature is not just about taking a photo; it is a mental rest and discovery process. Remember, the best photographs are often those that require the most effort.
What Will Future Astrophotography Technologies Offer Us?
Technology is evolving at a dizzying pace. In the near future, we will see sensors that produce zero noise even at much higher ISO values, camera bodies that automatically track the sky with built-in artificial intelligence, and much lighter yet sharper lenses. Even now, smart phones can take astonishingly good star photographs with multiple exposures and artificial intelligence assistance. However, no matter how advanced the equipment becomes, the eye that composes and the human spirit that stays awake to capture that moment will always remain at the center of photography. The future will make the previously unseen depths of the universe more accessible, but the excitement of pressing that shutter in the heart of nature will never change.